Complex AWS Migrations (Technical Blog Series)
July 7, 2022 – Paul Corley
Introduction
Welcome to our third blog around migrations to AWS. We have looked at ‘Why Migrate to AWS?’ and ‘How to Migrate?’ this third blog looks at complex AWS migrations which in this case we define as migrations involving databases or migrations that need to be carried out while production systems are live.
This blog will cover:
Migrating a Live Database using AWS DMS
Migrating Live Data using DataSync and/or Snowball Edge
Migrating a Live Database using AWS DMS
Most methods of database migration require a time delay as you back up the source database and restore it to the target database server. This delay requires the source database to be shutdown to avoid any uncaptured changes to the database. This is not suitable for a production system that needs to be always on as the application will need to be shutdown during this process. AWS DMS solves this issue.
AWS Database Migration Service (AWS DMS) – helps you migrate your current databases to the AWS Cloud reliably, quickly, and securely. The source database remains fully operational during the migration, minimizing downtime with the following features:
Continuous Data Replication: Perform continuous data replication between an on-premise solution and AWS without the need to stop your application.
Homogeneous Database Migrations: Homogeneous database migration means that the source and target database engines are the same or are compatible like Oracle to Amazon RDS for Oracle, MySQL to Amazon Aurora.
Heterogeneous Database Migrations: In heterogeneous database migrations the source and target databases engines are different such as Oracle to Amazon Aurora or Oracle to PostgreSQL.
There are three main steps in the AWS DMS process:
- Create Target Database.
- Create a Replication Instance which is an EC2 server that carries out the replication tasks between the Source and Target Databases. The instance will require storage which is dependent on the load expected from the replication task. You should minimize network traffic by keeping the Replication Instance in the same subnet as the target databases where possible in addition to implementing Security Groups and ACLs to allow replication traffic to flow.
- Create a Replication Task specifying the Replication Instance to use, the Source and Target endpoints and the Migration type option. The migration type option for a live migration is normally Full load + CDC. Full load migrates existing data while CDC, Change Data Capture replicates ongoing changes. The Replication Task can be tailored further to your requirement using the other options available.

In this example below we have created MySQL Aurora & PostgreSQL Aurora for OFBiz, we will be looking to perform the following:
Migrate the existing databases (running in EC2) to Aurora with AWS DMS specifically to MySQL Aurora.
Current Architecture

On this section we will start utilizing AWS Database Migration Services, by:
- Creating the replication network using Subnet groups
- Launching a DMS replication instance
- Configuring endpoints for source and target database
- Replicating databases using DMS replication tasks
To be able to launch a DMS Replication instance, it is necessary to specify what subnet group in the VPC the Replication instance will run. A subnet is a range of IP addresses in your VPC in a given Availability Zone. These subnets can be distributed among the Availability Zones for the AWS Region where your VPC is located. DMS Replication instance requires at least two Availability Zones.
The following step will demonstrate how to create the subnet group in 2 Availability Zones.
In the AWS Console, open Services, Migration & Transfer, Database Migration Service.
1. In the navigation pane, click Subnet groups, then select Create Subnet group.
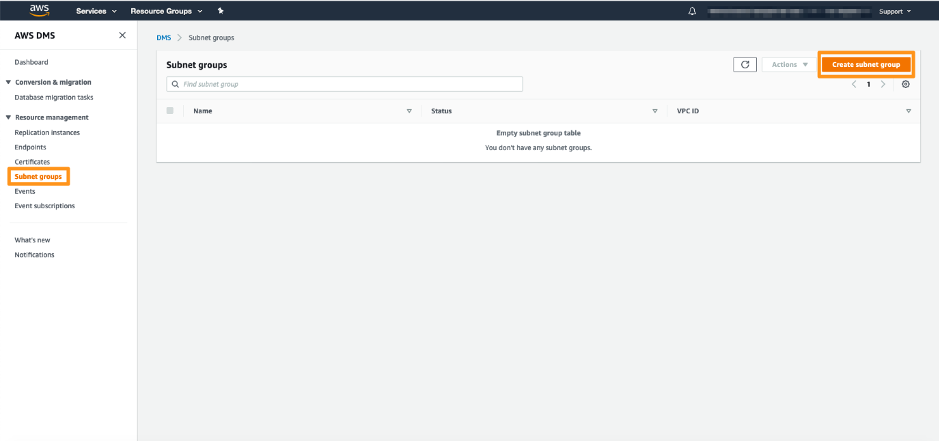
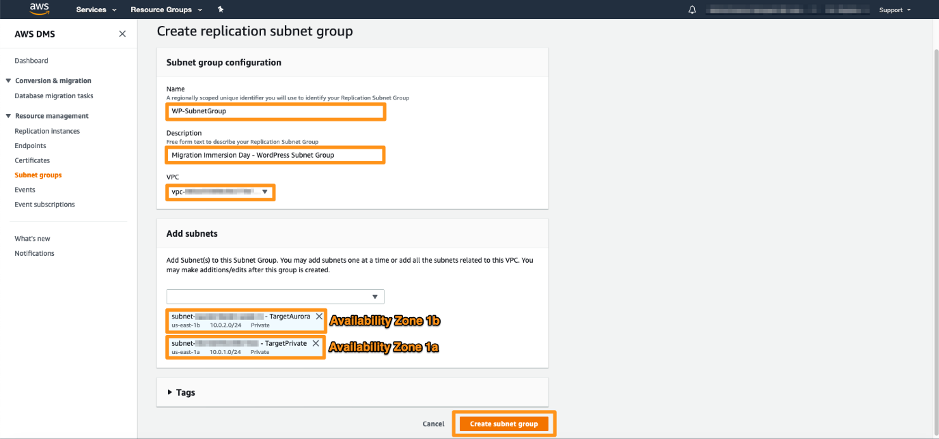
2. On the Create Subnet group page, specify the following settings:
1. Subnet group configuration:
– Name: WP-Subnet Group
– Description: Replication Subnet Group
– VPC: Target
Add subnets:
3. Select TargetAurora and the one that contains TargetPrivate
4. Click on Create subnet group
Our first task in migrating a database is to create a replication instance that has sufficient storage and processing power to perform the tasks you assign and migrate data from your source database to the target database. The required size of this instance varies depending on the amount of data you need to migrate and the tasks that you need the instance to perform.
1. MySQL Database
1. In the AWS Console, open Services, Migration & Transfer, Database Migration Service.
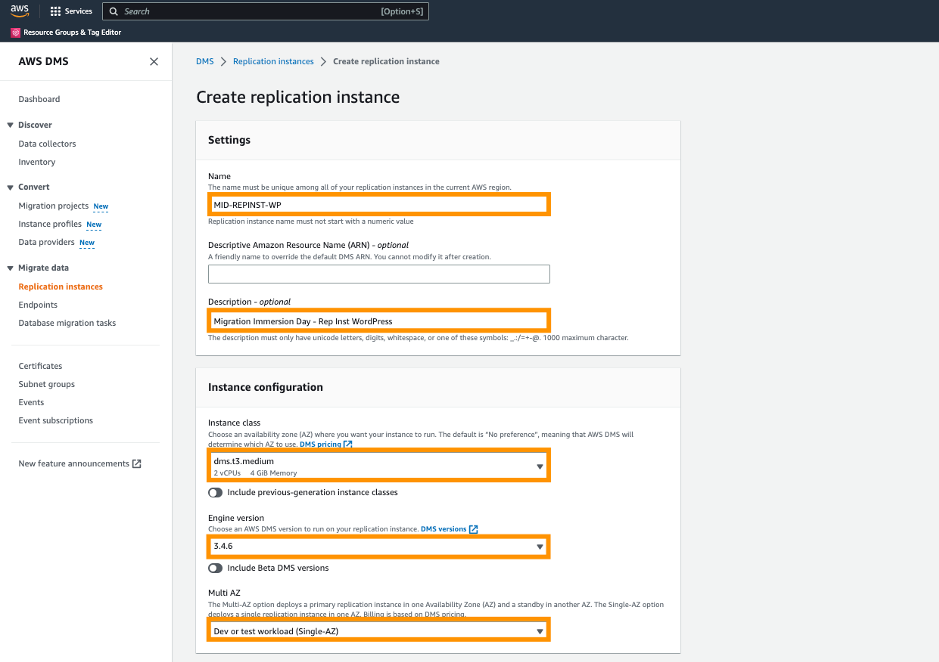
2. In the navigation pane, click Replication instances, then select Create Replication Instance.
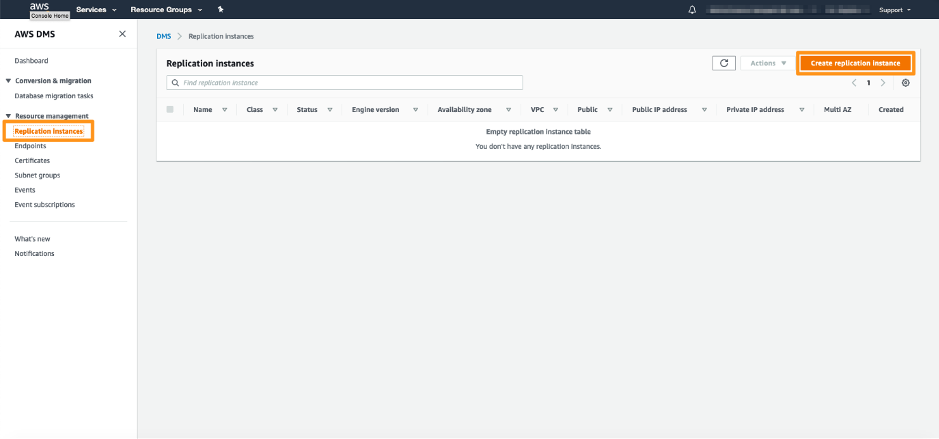
3. On the Create replication instance page, specify the following settings:
a. Replication instance configuration
4. Name: MID-REPINST-WP
5. Description: Rep Inst WordPress
a. Instance class: dms.t3.medium
b. Engine Version: 3.4.6
c. Multi AZ: Dev or Test workload (Single-AZ)
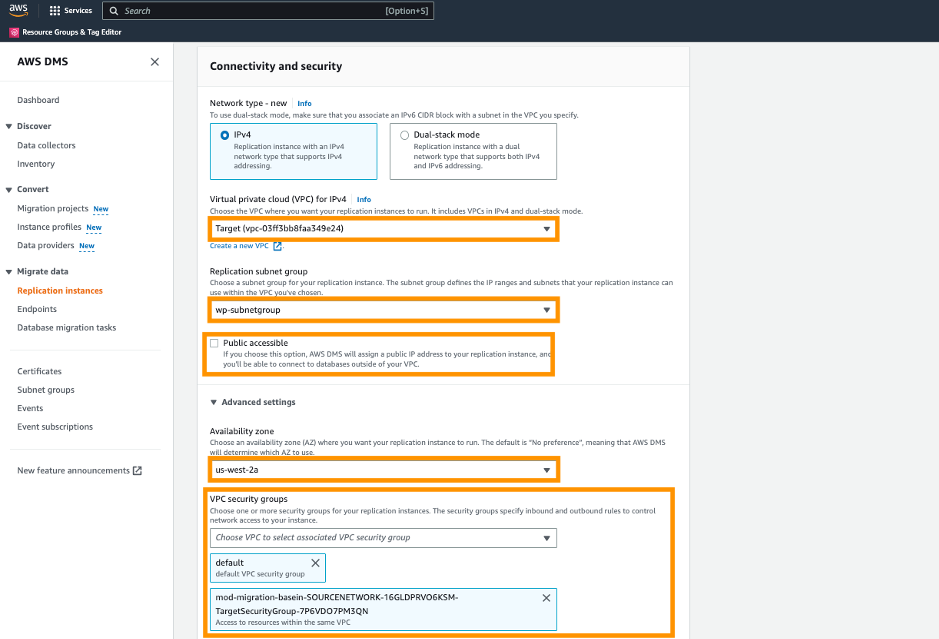
a. VPC: Target
b. Replication subnet group: WP-SubnetGroup
c. Publicly accessible: Uncheck
d. Availability zone: the one that ends with a
e. VPC Security groups: select default and the one that contains TargetSecurityGroup
All other settings can be used as the default values.
1. Click on Create Replication Instance
After this exercise is completed, you are set and ready to consider and specify your source and target End Points. The source and target data stores can be on an Amazon Elastic Compute Cloud (Amazon EC2) instance, an Amazon Relational Database Service (Amazon RDS) DB instance, or an on-premises database.
Migrating Live Data using DataSync and/or Snowball Edge
Migrating Live Data between storage systems is complex for the following reasons:
1. Volume of data may be very large such as TBs or PBs
2. Number of files my be millions
3. File integrity must be maintained between Source and Target
4. Requirement to demonstrate that all files have been moved and quickly resolve any issues where file transfer has failed
AWS DataSync can help resolve these issues by enabling you to easily sync your on-premises data with data in the Cloud.
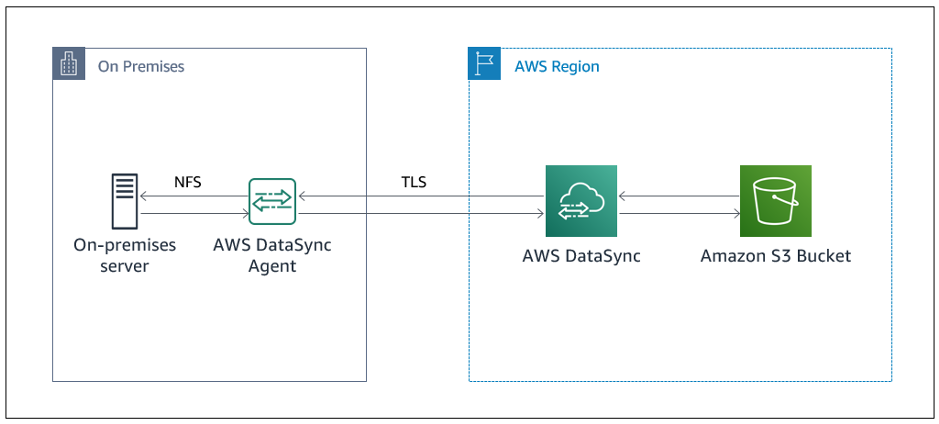
DataSync is thought of mainly as a tool that allows you to move files from NFS to S3 but has grown over the years to have support for copying data to and from NFS, SMB, HDFS, Object Storage, S3, Amazon EFS, Amazon FSX, Google Cloud Storage and Azure files.
A task needs to be created for each data transfer workflow. The main DataSync Components with descriptions are shown below:
| Component | Description |
| Agent | A virtual machine hosted on a hypervisor used to read data from or write data to storage. |
| Location | Any source or destination storage used to transfer data. Each location has a defined storage protocol such as S3 or NFS. |
| Task | A task is the complete definition of a data transfer. It includes two locations (source and destination) and the configuration of how to
transfer the data from one location to the other. Configuration settings can include options such as how to treat metadata, deleted files, and copy permission |
| Task execution | An individual run of a task, which includes options such as start time, bandwidth limits and verification methodology. |
| VPC EndPoint | A highly available endpoint service that enables DataSync traffic to privately connect between the source and destination locations. |
| AWS Management Console | Console allowing management of DataSync and related AWS services |
DataSync is an online data transfer tool and is dependent on available bandwidth which is often an issue for companies who have little bandwidth or little available bandwidth due to production workflows.
DataSync can be used in conjunction with the AWS Snowball Family where Snowballs are used to move the majority of the data and then DataSync is used to keep the on-premises and cloud data synchronised until cutover.
The AWS Snowball Edge is Amazon’s primary Snowball Family offering for moving large amounts of data. It is a portable ruggedized device providing up to 80TB of storage and 40vCPUs of compute which you connect to your storage devices allowing you to transfer data.
AWS ship the device to your site; you fill the device with data and then ship it back to Amazon where your data is ingested into AWS storage services such as S3. You can use the AWS Snow Family console to order and then track your data transfer job from Snowball preparation, Delivery, Collection and Ingestion. You are provided with a job report with success and failure logs.
Conclusion
In this blog post we reviewed options available when wanting to migrate a database into AWS utilising the AWS DMS & Migrating live data utilising DataSync.
We provided an approach which enabled how to migrate an EC2 instance to Aurora MySQL.
With the combination of the above approaches customers are able to significantly reduce manual efforts and potential misconfiguration issues during a rehost migration with AWS DMS and DataSync and as a result, accelerate rehost migration journeys to AWS.
We hope you’ve found this series on Migrating to AWS to be a valuable guide and are excited about the many benefits of migrating to AWS. Whatever your requirements are, there is an AWS migration solution to fit, from single applications and operating systems to more complex migrations and hybrid/multi-cloud environments. However, if you require assistance, please reach out to our experienced cloud team; as an accredited AWS partner, we will help you with every stage of your migration journey cloud@transactts.com